Her classes start at least a month later than most colleges, so I thought I had plenty of time. But ... I found out she was moving in to her apartment much sooner, so I had just a couple weeks to get everything done. I do work better with deadlines, because there's less time for procrastinating!
I had hoped, with Molly being a fun young gal, that she would want the bed to be a bright color like coral or kelly green or yellow, or maybe a graphic design like stripes or a stencil. Of course, I had no idea what her bedding looked like or any other accent colors she wanted to use. Much to my dismay, she chose to keep all her furniture in black and white so she's not tied to one design and could change up her bedding and accessories whenever she liked. Since her desk was already black, and her walls are light gray, I decided to go with white for the bed. I guess I'll have to save the bold colors and graphics for another project!
Here's the bed frame before:
We actually had a pair of these from when The Teen was younger and had two twin beds in his room -- one for him, and one for friends. They are solid oak and had been passed down to us by my father-in-law, but I never liked the outdated finish. One bed of the pair is currently set up in our guest room, along with the matching dresser, and I had been planning to paint them for some time but hadn't gotten around to that project yet.
Since the weather was unusually nice, I took the bed frame outside to sand it. I used my palm sander on most of the surfaces, and touched up with a medium grit sanding block.

|
| Ahh, fresh air! |
As usual, I used Elmer's Carpenter's Wood Filler in any visible cracks or dents in attempt to create a smooth surface. I sanded again after the wood filler was dry. After that, I brought the bed parts back in to the workshop to wipe it down before priming it.
I had planned to paint the bed frame while it was taken apart, but quickly realized it would be easier to set it up so I could paint all sides at the same time.

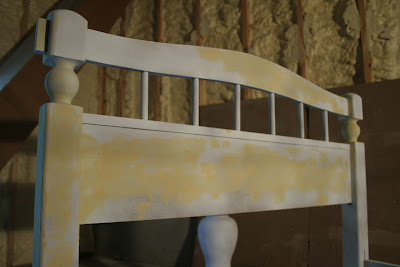
I started with one coat of Kilz Odorless spray primer. Once the primer dried, I could still see too much of the open grain for my liking. I don't know if this happens to anyone else, but I usually find all kinds of things after the first coat of primer is on that I couldn't see when just looking at the original wood finish. Since I wanted to have a smooth finish for this project, I used wood filler again, this time covering most of the headboard and footboard surfaces, plus a much of the rails.

|
| Look at all that wood grain still showing through the primer |

|
| I've never used this much wood filler! |
After the wood filler dried, I sanded it down, then sprayed another coat of primer. I used my paint sprayer to put on a coat of soft white paint. It's Behr indoor satin in the color Toasted Almond.
I already had the paint on hand from the Hepplewhite dresser I painted for our bedroom. I just love the paint name Toasted Almond, because it's the same name as my favorite adult beverage. Have you ever had one? It's a frozen blended drink made from amaretto, Kahlua, and ice cream. (The non-frozen version has milk instead of ice cream.) It's like a dessert in a glass! I first had it at a restaurant called The Cooker (now closed) in Cincinnati. Mmm, good stuff. But I digress.
Now back to the bed frame. ... After the first coat of paint dried, I noticed an issue. I had used so much wood filler trying to cover the open grain of the oak wood, that I inadvertently created a new surface on the headboard and footboard. The lighting is so bad in my basement workshop that before the paint went on, I couldn't see that I hadn't sanded the surfaces flat after the last (and major) application of wood filler dried. I got the palm sander back out and went to town, but couldn't get the surface as flat as it had been before I started. Because of my tight timeline, I wasn't able to spend as much time as I wanted getting it perfect, so I sanded it as flat as I could before several more coats of paint with my sprayer. For any furniture painting newbies, I also need to mention that after each coat of paint dried, I lightly sanded with a fine grit sanding block and then wiped off the dust before spraying on another coat.
After the last coat of paint dried, I used my paint sprayer to apply three light coats of Minwax Polycrilic in a satin finish. Like with the paint, I lightly sanded and then wiped the surface down between each coat. When it had dried, I moved the assembled bed frame aside so the Polycrilic could continue curing while I worked on the other pieces for Molly's apartment.
I only had a few moments to set up the bed on the lawn with the mattress set that I was sending along with the bed, as well as a quilt and pillow sham I had The Teen grab from our guest room for a staged photo.
The movers (aka Molly's brothers and grandfather) were literally waiting for me to snap a picture so they could load the bed on the truck and be on their merry way. They must have thought I was nuts, but then again, they don't know anything about decorating blogs. I mean, if you're a blogger, the cardinal rule is that you have to take photos. I may not always remember to get a before photo, but wouldn't let the bed leave my house without an after photo!
I asked Molly to take a picture of the bed in its new home in her apartment, so I'll share that with you next time.
Hollie


The amount of wood filler you used made me laugh - such a perfectionist, I love it!!
ReplyThe bed came out fabulous - I hope she loved it :) And I know how it is taking pictures for the blog when people are looking at you like WTF - no one understands our obligations!! hahaha
Hope you have a great weekend hun xxx
A bright color would've been awesome, but it still looks great!
Replyvb-creations.blogspot.com
i love the bed! i think the color is perfect and i love that bedding with it- it looks so cottagey!
Reply