| Antique map wallpaper |
| Wooden map letters |
| Heart map art |
| Lamp made of maps from any city you choose |
| Cardboard deer head covered with vintage maps |
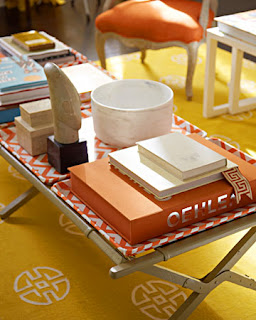
Trays are also big on the decor scene right now, and lots of people are creating DIY versions, like these fabric-covered trays made into a coffee table, which I included in my "crushing on chevron" series.
So I decided to combine the two and cover a tray with a map. Let's jump to the after photos (especially since I made you wade through all the inspiration photos first):
The before was a $1.00 find from Goodwill. She wasn't exactly a looker, was she?
Apparently she was donated at the end of a yard sale, because there was a 50 cent price sticker under Goodwill's $1.00 sticker. I don't think my Goodwill prices anything under $1.00. Oh well.
Aside from the tray and a map of my choosing (NYC), here are the other supplies used:
- Mod Podge
- Foam brush
- Newspaper to cover my work surface (not really needed, but I wasn't sure how messy the job would be)
- Flat edge (I used a kitchen scraper)
- Scissors (not pictured)
This was my first Mod Podge project ever, and I expected the packaging to give usage instructions, but it really didn't tell me anything. And I was too impatient to look up a tutorial online. So I went for it. Hey, it was a $1.00 tray, a used map and an under-$5.00 bottle of Mod Podge, so I wasn't too uptight about whether it was a success or a flop.
After wiping the whole tray down to get rid of any lingering dirt, I decided to brush Mod Podge all over the tray. Sorry, blurry photo and it's not like I can go back and re-shoot it. But you get the idea.
Then I centered the part of the map I liked best and cut off the excess, leaving enough to cover the inside of the tray, up the sides, down the outside, and under the bottom a little. I spread the map out inside the bottom of the tray, brushed Mod Podge all over, using the scraper to keep the map as smooth as possible.
Because I was using a flat map on a circular surface, I had to do a little bit of folding over once I got to the sides. I just worked my way around and around the tray, spreading the Mod Podge over as I went, and using the scraper to smooth things out. Then when I got to the top edge, I made cuts all the way around so that I could lay them flat (overlapping) as I Mod Podged the map down the outer sides. Once I got those finished, I turned the tray over and folded the ends around to the bottom, continuing to brush the Mod Podge over the top of the map as I went. I set the tray on a plastic container to allow the Mod Podge to dry. Most of it dried to the touch pretty quickly, but the parts where I was a little heavy on the Mod Podge took maybe an hour or so.
Once again, here's are some photos of the finished map tray:
And here's a reminder of the icky before:
I've been thinking about using wallpaper or wrapping paper to decoupage a laminate chest of drawers in our basement that needs a facelift, and I was considering using Mod Podge on the project, so this was a good trial run. The best thing about the dresser is that it's all flat surfaces. I would not recommend covering a curved surface on your first go at Mod Podge. It's a bit tricky and my tray is not exactly perfect, but the not-perfect parts are only noticeable really up-close.
So there you go. A DIY map tray. Now go forth and Mod Podge something. And then tell me about it.
I'm linking this project up to:
Sisters Stuff 6/8/11 Linky Party
Wow Us Wednesdays at Savvy Southern Style
Transformation Thursday at The Shabby Chic Cottage
Thrifty Decor Chick's Before & After Party
Somewhat Simple's Strut Your Stuff Link Party
Homemaker on a Dime's Creative Bloggers' Party & Hop
Hookin' Up with House of Hepworths
Garage Sale Finds & Makeovers Challenge at The CSI Project
Friday Remodelaholic
Sat. Night Special at Funky Junk Interiors
The DIY Showoff
Life Made Lovely Monday
Making the World Cuter Monday
More the Merrier Monday at The DIY Home Sweet Home Project
Tip Tuesday at Tip Junkie
Tutorial Tuesday at Newlyweds on a Budget
How To's Day at The Lettered Cottage
Twice Owned Tuesday at House of Grace


i have done that at Christmas time and given them as gifts for serving trays. You can also use material instead of paper on them!
ReplyVery cute and I love the price!
ReplyOMGoodness! I use the same tools as you - Pampered Chef pizza stone scraper and Ziploc Twist 'n Loc - great minds think alike. I love this Map tray, anything map related is always so fun!
ReplyThat is super cool. I love all the map ideas.
Replyahhh it's gorgeous! isn't mod podge the BEST!
ReplyOmiGOSH, love it love it LOVE IT!! My little grandsons will be spending the summer with me...this will make a GREAT rainy day craft for us to do together...and a nice memento of their summer in Nova Scotia! Thanks for the inspsiration!
ReplyIt looks fantastic! Great job!
ReplyWhat a great idea! I have an old tray sitting around that this would be great for
ReplyThis look fantastic! I haven't jumped on the map bandwagon yet-but I'm tempted to. Thanks so much for linking up to Tutorial Tuesday-be sure to come back next week!
ReplyKari
Newlyweds on a Budget
www.morganandkari.com
I'm impressed you got it so smooth, nicely done. I've been saving my maps lately--thinking of plastering my dining room wall with them??? I like this take on it though. Thanks for the inspiration.
ReplyJaime
I love it, I am totally obsessed with maps at the moment, I recently made this for our livingroom.
Replyhttp://madeinmorningside.blogspot.co.uk/2012/01/side-table-revamp.html
And I am now on a hunt for a cool globe that won't break the bank xox