Here's the finished product, for those of you that like to see the "after" photo first!
I had actually found this mod coffee table at Goodwill a few months ago for just $3. It had a laminate top and a bum leg, but I figured I could fix it up. The table was in my queue of projects when I heard Molly needed some furniture for her apartment, and I knew it would be perfect for her budget. ;)
I had no idea what color her other living room furniture would be, so I decided black would be a safe bet to coordinate with other things, and would help hide scuffs. After all, college students are known to be rough on furniture sometimes. Even if the furniture owner is careful as can be, you never know what crazy friends will do!
I started by sanding the whole table thoroughly, giving the laminate top a good scuff-up. After wiping it down, I sprayed on a couple light coats of black spray primer. Next I sanded it lightly with fine grit sandpaper to prep it for paint. Normally I use my paint sprayer, but I had some Polycrilic left in mine from the bed I had just finished for Molly, and I didn't feel like cleaning it out for black paint and then cleaning it out again to put more Polycrilic in. Instead I decided to use a small foam roller to apply the black paint, which would help me avoid brush marks. I thought about using a brush and mixing in some Floetrol with the paint to help avoid brush marks, but I was on a super-tight deadline to get the table done, and didn't have time to try that method out for the first time.
Unfortunately the foam roller did cause some brush strokes, so I ended up adding Floetrol anyway. I keep reading that people use foam rollers to avoid brush strokes, but the two times I've used one (both happened to be with this very same can of black paint), I had brush strokes. Do I just need a higher quality foam roller, or what? Please let me know if you have any suggestions.
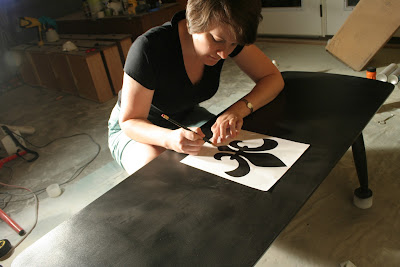
Anyway, after several thin coats of black satin latex paint (sanding lightly with fine grit after each coat dried), it was time to add something extra. Since the table's shape is so simple, I thought a graphic pattern would make it more exciting than just a blob of black. I considered stripes or some sort of allover stenciled pattern, but when I found out Molly is a big fan of the fleur-de-lis pattern, I decided that was the way to go.
I found a clip art version that I liked, inserted it into a Word document, increased it to the largest it could be for a regular sheet of paper, and then printed it out. I cut out the inside of the shape to create a stencil. I measured the stencil and the table, and decided that three across would look best.
Originally I had planned to paint right inside the stencil, but I was afraid it wouldn't last through all three times, since it was just a sheet of computer paper, and the edges would get wet with paint and might curl up. Instead, I traced around the inside of the stencil with a pencil, then used an artist paintbrush to paint over the pencil outline and then fill in the inside.
I used some white latex paint I had on hand (the same paint I had used for Molly's bed, actually) to paint the stencil. One thing I didn't like is that the paint wasn't flat to the table. Because I had to use lots of small brush strokes, the stenciled areas have dimension to them, whereas the surrounding black part of the table is very flat. Would this have been the same if I had used craft paint? The only thing I could think of was that I could've used a stencil brush and used my fleur-de-lis printout like a regular stencil. Any suggestions on the best way to paint a graphic on furniture? I plan to do it again in the future (different pattern, different piece of furniture), and want to make it look the best I can.
I did try to sand down the dimensionalized white paint a bit, but didn't want to smudge it, so I gave up on that and decided to put my perfectionism aside and be happy that it looked great!
Coffee tables get a lot of use, so I used my paint sprayer to give the painted table several light coats of Polycrilic (lightly sanding after each coat dried). It was still curing when Molly's "movers" came to pick it up, so I snapped a quick pic before it got loaded carefully into the truck.
I've asked Molly to send me a photo of it in its new home, and will share that when it comes along. I hope she's enjoying the table in her new apartment living room!
Hollie
Linking up to:
- Before & After Party at Thrifty Decor Chick
- Tip Junkie's Tip Me Tuesday
- Power of Paint Party at Domestically Speaking
- Piece of Work Wednesday at Primitive & Proper
- Wow Us Wednesdays at Savvy Southern Style
- Transformation Thursday at The Shabby Creek Cottage
- Saturday Night Special at Funky Junk Interiors
