Tuesday, August 30, 2011

Antique chest of drawers for bedroom

The last piece of furniture to be replaced in our bedroom is our chest of drawers.  Then we'll be ready to sell our old bedroom suite.  Since our new-to-us furniture is all painted (white dresser, turquoise nightstand and writing desk/chair), I thought it would be a good idea to leave the chest of drawers stained wood.

While it's not too hard to find vintage or antique pieces that need a few coats of paint, it's tricky to find a chest of drawers that's in good condition, with a stain color that won't clash with our chocolate brown walls, that's also in our price range.

And then I spotted this beauty in a local furniture consignment store:


I immediately texted a photo and a price to The Mr., who was at work, then I meandered around the store waiting for his response.  I didn't hear back from him, so I assumed he was in a meeting at the time, and moved along to my next errand.  He responded a couple hours later that he really liked the dresser (from the small photo he saw on his phone, anyway).  I called the store to see if they would hold it for me, and found that another buyer had beat me to it.  She had put it on hold until the following day.  I asked them to take my contact info just in case the other sale fell through. 

A week later The Mr. suggested I call to see if the chest was available, and I scoffed at him, insisting the store would have called me much earlier because they were only supposed to hold it for one day for the other person.  A few days later, I received a call out of nowhere that indeed the chest was available.  I had to eat my words, but I was happy to do it!  I immediately paid for the chest over the phone, then arranged to borrow a truck to pick it up.  What a nice birthday present for me!  (Today is my birthday.)

It's now sitting in my bedroom, but I have to move the old chest out, then move the "new" antique dresser into its place, then put the drawers in, etc.  Then I'll take some updated bedroom photos and share the full updated room with you.

Is there anything you've been on the lookout for?  I thought I'd never find a vintage/antique chest that would work for our space!

Hollie
Thursday, August 25, 2011

Turquoise writing desk featured at My Repurposed Life

Many thanks to Gail at My Repurposed Life for featuring my turquoise writing desk today!  Gail hosts a weekly "Catch as Catch Can" link party on Thursdays.  Hop on over to Gail's site and see what other projects were "caught,"  plus you can link up a project of your own.


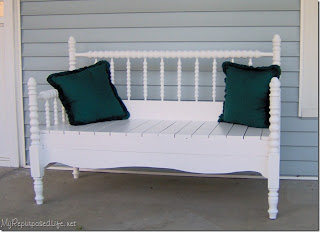
I have to also compliment Gail's creativity.  Her specialty is repurposing items into something totally different, like the beds she turns into benches ...


... or an old crib that she turned into what could be used either as a sandwich board or an child's easel.


Cool, no?  I admire people who can think out of the box!  What have you repurposed?  Do tell!

Hollie

Wednesday, August 24, 2011

Crushing on board and batten

Lately I've been crushing on decorative trim and wainscoting, board and batten in particular.  This classic treatment can go from simple, like in this mudroom:

via Centsational Girl

to wow, like in this grand foyer:

via House of Turquoise

Board and batten, a type of wainscoting, usually consists of a flat back panel (board) with thin strips (battens) to cover the seams between panels, plus a trim piece across the top.  This style is typical of Craftsman and Shaker design, with the simple lines and flat panels.

Here's an example of board and batten used in a traditional Craftsman home, with the wood stained instead of painted.

via This Old House

A higher grade of wood is required if you plan on showing it off with stain instead of painting over it.  Today, most board and batten is constructed of low-cost plywood and/or MDF, then painted over for a fresh, modern look.

Like other wainscoting treatments, board and batten can stop at chair-rail height, like in this nursery:

via On to Baby

Or go around 2/3 of the way up the wall, like in this bathroom:


Or rise all the way up to the ceiling, like in this living area:


Always a simple, clean-lined treatment, board and batten can be jazzed up with the addition of extra horizontal pieces for more visual interest.

via Thrifty Decor Chick

via Houzz

via 4 Men 1 Lady

via Better After
A plate rail can even be added at the top to display photos or artwork, perfect for a dining room.

via Hello Newman's

Clearly there are a million different ways to use board and batten in a home.  Now I just have to (1) convince The Mr. it's a good idea for us; and (2) decide where to use it.  Since we have a Craftsman home, it will fit in just perfectly with the style of our house.  I do think we have some areas that could use some additional architectural interest, like our dining room.


You think we should go for it?
Hollie

Tuesday, August 23, 2011

Get Me Motivated Monday ... er ... Tuesday

I've decided to change my "Metamorphosis Monday" series to "Get Me Motivated Monday."  The latter name fits better with my procrastination theme, doesn't mandate that the item be a before & after, and will hopefully alleviate any confusion with the Metamorphosis Monday link party at Between Naps on the Porch.  Although I thought of the name independently of the BNOTP blog, since I discovered the match, it's been bugging me, and Susan certainly used her name long before I did, so I decided to come up with something new.

Yes, I'm a day late this week.  I know my readers could care less what day they get posted, but having a day of the week specified in the series name keeps me on task!  Well, except yesterday when I forgot.  But you can forgive me because I had already posted Monday morning about something else, and then I got caught up in my basement overhaul project.

So ... without further ado, here are the projects that got me motivated to do something this week:

1.  Wallpaper made of tiny stickers

Room view

Close-up view

It's part of an art installation called "The Salon at Sundown."  I found the photos on Pinterest, but the original article is via CRAFT blog.

2.  Paint chip scavenger hunt

The berry is a match!

Laura from Come Together Kids saw this idea on the Frugal Family Fun blog and implemented it with her family this summer.  You give the kids a set of paint swatches and have them find items that match.  You can tailor the colors to work for outdoors vs. indoors, or the season, or the specific location of the hunt.  What a fun way to get the kids moving and exploring!

3.  If you like a piece of art but it doesn't match your color scheme, change it!


 You can always completely repaint over canvas art and start over, but if you have a simple graphic that you're still fond of, why not just change it to match your new color scheme?  Great idea by Pam, the diy Design Fanatic.

4.  Unique, distressed state love art


There are many cute examples of "state love" art, especially on Etsy, but this one is unique.  Laura from Corner House found some old maps online, used Picnik to give them an aged look, and then used a distressed photo transfer technique on 12 x 12 canvases.

5. Transform a drab dresser into a bright changing table + storage


The cheery yellow color of the newly painted dresser is super for a nursery.  Its drawers give Dina from Honey & Fitz lots of storage for all those tiny baby things, and by just using a changing pad on top, the family is not tied to buying a separate changing table that would be useless when the baby grows older.  Don't you love how the rainbow-colored abacus is hung above the changing table, too?

-----------------------------------------------------------------

Thanks to these ladies for getting me motivated this week!

I also couldn't let any more time go by without celebrating a special milestone.  I started this blog five months ago, and reached 100 followers last week!  Of course, Google Followers is only one way to measure your readership.  There are others who subscribe via a reader or email that don't follow me via Google Friend Connect, and that's awesome too!  I appreciate all of your support ... and motivation ... and especially comments!

Hollie

Monday, August 22, 2011

Turquoise writing desk featured at Primitive & Proper

Thanks a bunch to Cassie at Primitive & Proper for featuring my blah console table turned turquoise writing desk!  Cassie hosts her "Piece of Work Wednesday" (POWW) link party weekly for furniture projects only, and she picked mine and three others out of a sea of 87 entries as her favorites this week.

I love that Cassie's party is only for furniture, because that's my thing.  These two pieces stood out to me from this week's party:

Sweet pink dresser by Rustic Raspberry

Coral desk by Liz Marie Blog

If you makeover furniture, craft, or DIY just about anything, there is a link party out there for you.  It's a fun way to see what other people are doing, to show off your own work, and especially to be introduced to lots of other neat blogs and bloggers.

Thanks again, Cassie!

Hollie
Sunday, August 21, 2011

Yard sale treasures: Pineapple lamps, a vintage fan and other steals

Sometimes you walk away from a yard sale empty-handed, and other times you hit the jackpot.  My latest yard sale stop netted me my favorite finds ever!  And to think I almost passed it by, assuming they couldn't possibly have anything I'd want!

The purchase of the day is a pair of 1940s-era brass pineapple lamps.


The pair was priced at only $10.  The seller mentioned he could get more for them at a scrap yard, so I scooped them up before he changed his mind about selling them!  I have never seen anything like them, so I did a little research online and found some almost-identical lamps posted on eBay for $90-$100 each.  Those were just individuals, so I assume a matching pair would bring a higher value.  I couldn't find any other info online.  Anybody have personal knowledge about these lamps?  The Mr. and I are so curious!

My next steal is a vintage table fan in robin's egg blue.


It wasn't priced, so I asked the seller what he wants for it, and he said $2.  Serious?  I picked it up immediately and was checking out the cord, which looked a bit sketchy.  Before I could even make a move, the seller said since it would need to be rewired, he'd knock down the price to only $1.  Um ... it was a steal at $2, so I think I'll take it for $1.

Ironically, The Mr. and I were researching fans just like this a few months ago.  I had told him I really wanted a chandelier over our bed rather than our ceiling fan, but we agreed we still need to be able to move air around in the room.  Since he's into vintage things and since I love the color turquoise, we had thought a vintage fan might be a good option.  They're pretty easy to find on ebay, and I even spotted one in a local antique store, but the price was never right and we basically forgot about it until now.  I'll have to find out what it would take (and cost) to get it rewired and then decide if it would even work for us.  My guess is that they're rather loud.  Anyone know about the sound or the rewiring costs?

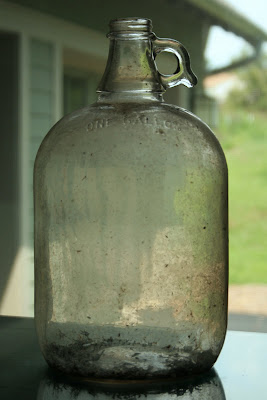
A very unassuming item that caught my eye is this clear glass jug.  It was dirty and bug-filled, but at only 25 cents, it's a bargain.


My last treasure, which may or may not really be worth much, is an arc floor lamp with marble base.  The shade is hideous in my opinion, but that would be easily changed.  The marble base is super-heavy.  It has been chipped at one corner but I think it's still pretty neat.  The price?  Just $5.


Lesson learned:  Never pass up a yard sale.  You might assume you'll find the best stuff at nicer, newer houses, but in fact they often have just useless junk.  (Unless you're shopping for kid-stuff, and then they're usually your best option.)  Yard sales hosted by people over the age of 70, especially if the house is old and it looks like the people have lived there a long time, often have the best finds because the items tend to be better quality that have stood the test of time.  They may need some cleaning or refurbing, but if you keep an open mind, you can discover like I did today!

What do you think about my finds?  Trash or treasure?  If you have additional info about any of them, please let me know!

Hollie

Wednesday, August 17, 2011

Basement overhaul phase 1

Like I mentioned yesterday, a basement overhaul is underway.  The first phase was finding a new location for my storage shelves.  They used to be lined up along this concrete wall (you can still see one in the far corner).


But that side of the basement has become my workshop, and I needed to move that shelving out so it could be better protected from sanding dust and paint overspray.  First I had to clear out space on the other side of the basement, then I took everything off each shelf and moved them over to the new location.  I wiped down every shelf and item to get as much of the sanding dust off as possible.  Then I refilled the shelves.  Plus I assembled and filled some additional shelves that I had purchased.

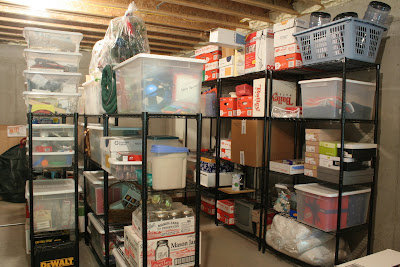
Here's what my shelving area looks like now:


I stationed the newly assembled 5-tier shelving on the back wall and filled them with boxes and bins of items that are ready to be yard-saled.  I then left an aisleway for access and put my previously used 4-tier shelves in two back-to-back rows across the aisle.  The aisle allows me to put shelving out in the middle of the room and not just along the walls.


Each shelf unit has similar items on it.  There's one unit with home improvement necessities like paint and painting supplies, caulk, plus tapes and adhesives.  Another unit has overflow grocery items like paper towels, TP, flour and lightbulbs.  Two units house my holiday decor.  One unit includes sporting goods like balls, frisbees, water guns, and a sleeping bag.  I also have bins for candles to be used in power outages (like this past weekend) and for potential small gifts for friends and family.  There are many more unmentioned items, but you get the idea.  Like items are stored together.  Simple enough, right?

The basement is looking better already, and phase 2 is underway.  I'll be sure to keep you posted. 

Hollie

Tuesday, August 16, 2011

Basement workroom progress

I've been doing most of my furniture makeovers in our unfinished basement.  There's a sizeable amount of space, and I wasn't worried about any paint overspray getting on the walls or floors.  But the one thing that has been an issue is the dust from sanding getting all over everything else that's in the basement.  My first project involved white paint, so it just looked like a regular layer of dust on things.  But the last three pieces I've worked on were turquoise, so it's become pretty obvious that the sanding dust is a problem.

An entire basement overhaul is needed, and I'm on it! Here's what my "workshop" area looked like before:


This area was just to the right of that last shot, and was the first area I tackled.  That concrete wall was actually lined with storage shelves like the one you see in the corner. 


Of course I forgot to take a photo before I started moving things and I certainly was not going to move them all back just for a photo op, so you'll just have to imagine five more shelving units filled with storage bins and other things, all covered with a layer of turquoise dust overtop a layer of white dust.  Not a pretty sight.  Speaking of not a pretty sight, look at that mess!  Some of it is my supplies, like the tool box, spray paint cans, Floetrol, sanding wedges and such.  The rest of it is thrifted items I've brought home as possible projects, mirrors and bed frames that are being stored, and junk that made it down the basement steps but did not get put away.  Surely I'm the only one who has a messy basement like this.  No?  Okay, well you better get down to yours and get a move on, because mine is going to be looking good very soon.

I must head back to the basement to continue my work, and I'll keep updating you on the progress.

Hollie

Sunday, August 14, 2011

Metamorphosis Monday #6

I haven’t completed any big projects myself since before our vacation a month ago.  (The turquoise writing desk was done before vacation, but I just got around to writing about it a couple weeks ago.)  It’s high time I get back in the swing of things this week.  In the mean time, here are the projects that other bloggers completed that inspired me in one way or another over the past week.

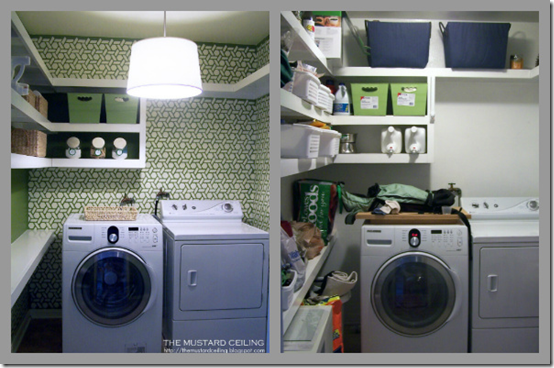
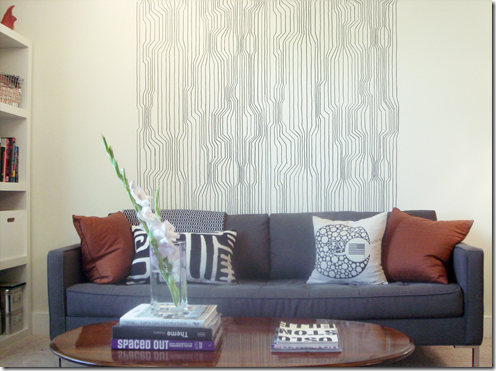
I’m on a wall coverings kick lately, and this laundry room wallpaper is yet another push for me to do something interesting with at least one wall or room in my own home.  Wallpaper is such a simple thing but makes such a big impact.  The green and white color scheme is so fresh and really livened up what was once a very dull laundry room.  Nice choices by Elizabeth at The Mustard Ceiling!  I like the new drum pendant light too.

image

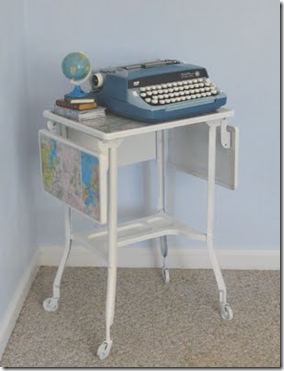
Have you heard about using resin to get a glossy, durable finish?  I’ve seen it done on a side table and on a tray, but this resin project really made me want to try it out.  Carrie at Lovely etc. used Mod Podge to adhere some maps to this vintage typewriter table, only there were too many wrinkles for her liking and she was afraid the finish wouldn’t be durable enough.  She decided to top it with resin, and now it has a smooth, shiny finish.  Isn’t the table adorable?

image

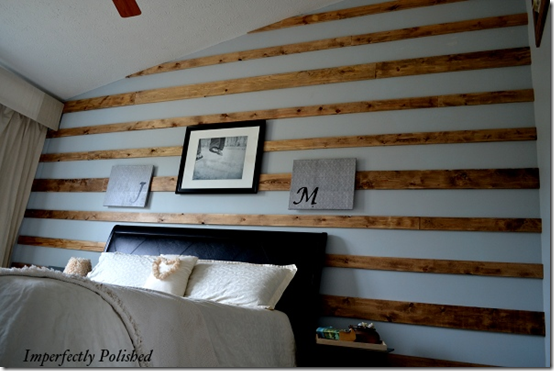
It takes guts to put up any wall treatment that is more than just paint.  Jessie from Imperfectly Polished pushed the envelope by adding wood slats to her master bedroom wall.  It gave the room a wow factor that it didn’t have before.

image

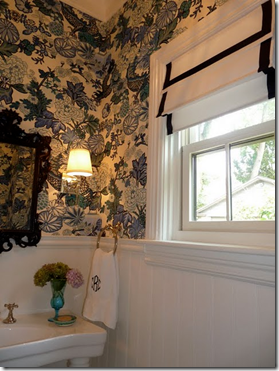
This next metamorphosis just keeps getting better.  Carrie and Chris from Hazardous Design did a complete makeover on their powder room.  I thought it was awesome when they revealed it back in May, but the addition of a roman shade with DIY’d grosgrain ribbon trim is a perfect complement.

image

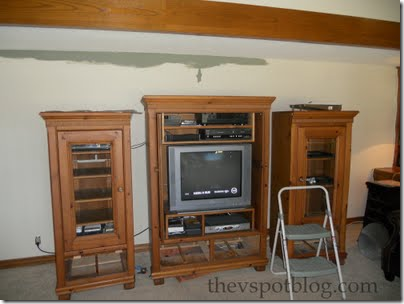
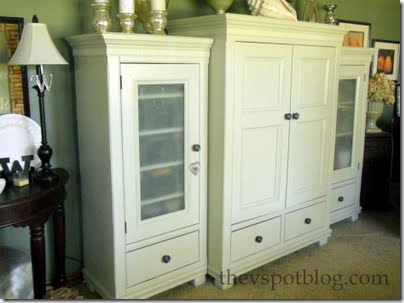
Thank you to Vivienne from The V Spot for reminding people that you don’t have to live with dated furniture, even if you’re on a tight budget.  So many people have furniture in their home that has this style and stain finish.  Paint does wonders, I tell you!  Here’s her media center before:

image

And here’s the more updated after, which looks great against her new sage green wall.  Much improved!

image

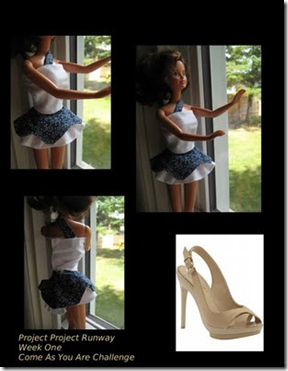
Need a laugh?  I got a big laugh when I learned about Project Project Runway.  Susi and Kat of Just Crafty Enough came up with the idea, and this is their second “season” of the non-competition.  Participants use fashion dolls as models, and follow the actual Project Runway challenge each week to create an outfit for their dolls.  They even use the “Piperlime accessory wall,” which I can only assume means they choose accessories on the Piperlime website.   For instance, Tawny of The L-T Experience revealed this lovely number for week one’s “Come as You Are” challenge. 

image

That was the one where the designers had to make outfits from the clothes they had worn to bed, plus a white sheet.  Participants have to share their “workroom” photos and “runway” photos on the Project Project Runway Flickr site each week.  You have to read Tawny’s post about her design.  It totally cracked me up the way she described it as though she and her “model” were participating in the real competition.

Thank you to all these fine ladies for yet another week of inspiration (and laughter)!

Hollie

Thursday, August 11, 2011

Sharpies in designland

Who doesn’t love a Sharpie marker?  There’s something very powerful in that little marker package, and I’m not even talking about fumes.  In fact, Sharpie just launched a new campaign called “Start with Sharpie” to feature all the inspired projects created with their little markers-that-could.

Sharpies aren't just for posters any more.  Artistic folks have been using the ol’ Sharpie in home design to create low-cost, high-style looks, both small-scale and large.

Recreating a Favorite Fabric or Wallpaper on the Cheap

image
Sharpie on white vinyl to mimic Brunschwig and Fils' Les Touches fabric (via Little Green Notebook)

image
Katie Ridder's Leaf wallpaper was recreated in Sharpie on a bathroom wall (via Gus & Lula)

image
Sharpies and a little paint mimic Shumacher's Birds and Butterflies wallpaper (via Shannon Berrey Design)

image
Sharpies were used to trace over an AutoCAD-created transfer of a scaled -down version
of the Frekvenssi wallpaper for Marimekko (via Curbly)


Execute Your Own Unique Design Ideas

Who needs dye to make fun Easter eggs?  (Alisa Burke, via Pinterest)

image
To make a low-cost "headboard," create your own stencil and trace it
with a gold metallic Sharpie (via Gus and Lula)

image
Dress up a lamp with a Sharpie oil paint marker (via HGTV)

image
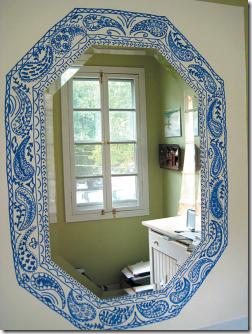
Got a mirror with an ugly frame?  Ditch the frame and make your own on the wall! (via Time Out Chicago)

This colorful treatment was painted in a retail dressing room, but you could do something similar in your home with a Sharpie (via Apartment Therapy)

This is a bathroom update anybody could do -- artsy pinstripes (via Persia Lou)

Now, this is the Sharpie creation to top all Sharpie creations, in my book.  German installation artist Heike Weber made a floor look like it has waves.  Wow.  I'll leave something like this to an expert!


(via Apartment Therapy)

I was in Walgreens last night and passed by a display of Sharpies in all kinds of colors.  My mind started wandering, which can be a dangerous thing.  I've been considering either a painted stencil or wallpaper for my powder room and/or bathroom, but I'm intrigued by this Sharpie art and wondering if I should try a Sharpie design first.  What do you think?

Hollie

Newer Posts Older Posts Home