Friday, October 28, 2011

Fanciful file cabinets

File cabinets are a utilitarian item that can sometimes be a real drag.  There are a few options out there that look more furniture-like, but for the most part, chic file cabinets just don't exist.  In the mean time, people have taken the issue into their own hands and transformed boring metal file cabinets into something much more exciting.  Here are a few examples:

This one was spray painted green, and vinyl adhesive wallpaper was affixed to the drawers.


This one was neglected and rusty before it was rescued, cleaned up, and painted.  Isn't the vine pattern lovely?


This black cabinet was purchased on Craigslist on the cheap.  Mod Podged wallpaper on the drawers and some new cup pulls gave it a new look.


This is another example of how wallpaper and new handles can turn a file cabinet from blah to beautiful.


Taking it a step further, this cabinet was covered all-over with fabric and Mod Podge.  That's a lot of work!


And for a bit of fun, I thought I'd throw in this Super Mario version.  Sweet!


All the cabinets above are vertical, with flat-front drawers and hardware that can be removed.  Lateral file cabinets can be a little trickier, depending on how the drawers are opened and whether the pulls are integrated into the metal or not.

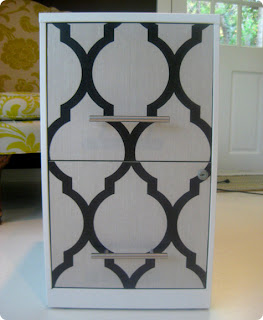
This one is covered with wallpaper or heavy wrapping paper, and attached with spray adhesive.


This cabinet's factory paint job was stripped and sanded to create an industrial vibe.


Designer Mary McDonald even DIY'd this large lateral file with a giant photocopy of a favorite wallpaper as a camouflage.


DIYs are great and all, but most times we DIY to save money.  In this case, we're DIYing because the product doesn't exist in the marketplace.  Hmm ... anybody got some money to invest in a new company?

Hollie
Monday, October 24, 2011

Get Me Motivated Monday

Well, I survived a week of work last week.  After nine months of mostly having my time to myself, trying to concentrate in a quiet office for a whole week was rough!  (I know, tiny violins playing a sad song for me.)  Technically I did only work half days on Tuesday and Wednesday because of prior commitments, so that helped.


I'm working in marketing again, which is what I have the most job experience in, but this company is a totally different industry than one I've been in before, so I have lots of new acronyms and industry terms to learn.  And lots of research to read.  And since I can't seem to get myself to bed early enough to get more than six hours of sleep, I hope I start getting busy at work soon, so nobody finds me sleeping at my desk at 2 o'clock in the afternoon.


Although I don't have the opportunity to spend my weekdays on DIY projects any longer, I hope "Get Me Motivated Monday" can push others to create something great!  Once marching band season is over for The Teen, hopefully I will have time to do some DIYing on the weekends again!  (By the way, The Teen's marching band advanced to the state finals today.  Next Saturday they play at Lucas Oil Stadium, where the Indianapolis Colts play.  For those of you who don't live in Texas or Indiana, you may not understand the big deal about marching band, but it's a big deal around here!)


Without further ado, here are the projects that knocked my socks off this week:


Katie at Craptastic knocked off some cute Target pillows in a fun color scheme of blue and pink.


Jessica at My World Made by Hand crafted a mummy costume for her daughter.  It wasn't even the cute costume itself that caught my eye, though, but the interesting angle of the photo, with the creepy hands coming toward the camera creating perspective.  Sometimes I need a reminder to jazz up my photos beyond the normal!


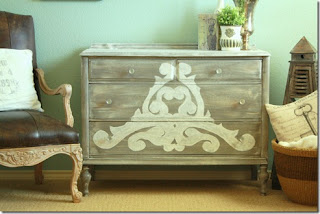
I'm smitten with the weathered finish of this little dresser painted by Kristen from FarmStyle Studio.  The scroll stencil on the front is what brings the wow factor!  If you live near Frisco, TX, you can check out Kristen's furniture refinishing business called Urban Farmhouse.


Do you know what a minnow trap is?  Yeah, me neither.  I do know that a minnow is a fish, so I can make assumptions from there.  Anyway, Katie at Sweet Girl Expressions took two minnow baskets (which make a trap when attached together) and transformed them into pendants with the addition of light kits.  Cool!


Julie from Less-Than-Perfect Life of Bliss converted a coffee table into a diamond tufted ottoman for her living room.  Her tutorial made it sound so easy!


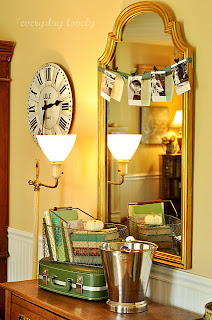
Cailan from Everyday Lovely transformed a drab thrifted mirror with a bit of acrylic paint and Rub-n-Buff.  It looks great in her entryway.


I don't think the photo does justice for this intricate marble-topped table.  Rebecca at White Street Interiors spotted it in the back warehouse at the Habitat ReStore and scooped it up right away, knowing it just needed a color update.  Isn't it lovely in a grayish-green?


Whitney and Duston from The Rooster and the Hen made a headboard out of pallet wood.  It goes all the way up the wall to the ceiling.  Can't wait to see it behind a bed!


----------------------------------------------------------


If you were featured here, thank you for the inspiration, and please grab my button!


Hollie

Friday, October 21, 2011

Wall + push pins = necklace storage solution

I don’t know about you, but I have a bit of an obsession with necklaces.  As a little girl, I had a small tabletop jewelry chest, which worked fine for the few pieces of jewelry I had at the time.  Recently I showed you how I sort and store my earrings using a compartment organizer.  It easily slips into one of my bathroom cabinet drawers.  However, my necklaces are another story.  For a while I was using a larger compartment organizer, which would fit into the same drawer, but as I accumulated more and more necklaces, and as they got chunkier and chunkier, that method was no longer working.  I don’t have any floor space in my closet for a jewelry armoire, so I came up with a different solution!


I hung my necklaces on a wall of my closet, next to my hanging clothes.  All it took was a few push pins!  Alternatively, I could have used small hooks, but I had the push pins on hand, and they make it super-easy to slip the necklaces on and off.

The benefits of this solution:
  • I can easily see my options when getting dressed
  • No tangled necklaces
  • No extra space taken up
In the photo above, I pushed my clothes to the side so you could get a good view of the necklaces.  Here’s what it looks like when my clothes are hanging as normal.


All you need is a wall and some push pins.  Easy enough?  (Just make sure you use three-dimensional push pins, not flat thumbtacks.  And make sure all your push pins are the same color so they match.  Just kidding.  But mine do, because I'm a bit OCD.)

Two things to consider regarding spacing of your push pins:
  1. How long your necklaces will hang:  I put shorter necklaces on the top row, allowing the longer necklaces to hang down from the bottom row.  You might want to measure the hanging length of your longest necklace to make sure you leave enough room.
  2. How wide your necklaces are when hanging:  Chunky necklaces take up more width than more delicate ones, so you’ll need to space your push pins out accordingly to accommodate both types.
Would this solution work for you?

Hollie


Linking to:

Tuesday, October 18, 2011

Times, they are a changing

My usual mornings for the past seven months:


My mornings as of this week:


Yep, I've gone back to work.  Monday was my first day.  Eek!  What have I done?!

A few weeks ago a friend/former colleague mentioned an opportunity at the company where she currently works.  Over lunch, she changed my outlook from "thanks, but no thanks" to "hey, that sounds interesting."  By the time I got home after lunch, I was convinced to give it a go.

Five weeks later, and I'm back in corporate America.  Before my seven-month hiatus, I worked in non-profit for five years, so going back to a very large corporation was a hard decision for me.  I am also the type of person who likes being an expert on a topic or process, so the idea of starting fresh scared me a bit. I had a last-minute freak-out last weekend, but once I got to work on Monday (and started by listening in on several conference calls), everything was fine.

Even though I've had over a month for the idea to sink in, I almost still can't believe I'm back at work!  Unfortunately I won't have as much time to work on projects around the house.  I'll definitely keep blogging, but if my posts aren't quite as frequent, you'll know why.  I'll be sure to fill you in on how things are going once I get settled in to my new routine.

Now it's off to bed for me so I can get up and out with the rush hour crowd in the morning!

Hollie

Monday, October 17, 2011

Get Me Motivated Monday

Today I'm doing something a little different for Get Me Motivated Monday.  Instead of featuring projects from all over blogland, I'm obsessing with one blog in particular.

Last week I saw this coastal map covered coffee table done by Kristine of The Painted Hive.


She had rescued a beat-up glass-topped table on eBay by painting the metal frame white, then covering the scratched glass surface with a map.  The refurbed table lives at her parents' beach house, which is just perfect.

I knew immediately that I wanted to feature the table in this week's GMMM post, but was drawn to some other project photos on Kristine's home page, so I started poking around her blog.  Wow ... she has a real eye and a lot of talent!

Her personal home style seems to be a fresh, clean cottage look.  Her colors are neutral and natural, and her spaces are relaxed.  She puts just enough into the decor so that it's finished, but clean and uncluttered.  Her rooms have a vintage feel, but more upscale than "shabby."

Kristine is a skilled rehabber, and has produced some amazing transformations for her home and for her eBay shop.  (Sorry to those of us who aren't anywhere near Melbourne, Australia!)  Here are a few that I'm ga-ga over.

First is this awesome aqua industrial cabinet (or locker?). This is just the kind of thing that the Picker Sisters would freak out over.


Next is a boring deco dresser that she now uses as a nightstand.  Instead of using a traditional paint stripper, she used commercial grade graffiti remover and said it works great!  (Note:  It's readily available online if you're interested in trying it.  I know I want to.)  Aren't the library pulls perfect?  And the stain color?


Another industrial look is these vintage schoolhouse stools, which Kristine brought back to life.  The stencils are based on text from vintage flashcards, and give the stools just the right amount of panache while still keeping their simple charm.


After checking out Kristin's blog for a while, I realized I had featured her music stand-turned-tripod lamp a while back, when I had first blogged about the merits of Pinterest.


I'm pretty picky about which blogs I follow, as I can never keep up with my reader as it is, but I am now adding a new one to my list.  Hop on over to The Painted Hive and check it out yourself!

Hollie
Sunday, October 16, 2011

A bold pop of color for the living room

Now that my living room art situation is all worked out, I can officially start accessorizing the rest of the room.  Hooray!  I've been on standby in there for far too long.

I didn't wait to much time, of course!  My first post-art purchase was a pair of red pillows to bring out the little splashes of red in the artwork.


It's the Dharti Pillow by the brand Bholu, and I purchased them from Fab.com last weekend.  Via the flash sale, they were 64% off retail.  Even with the discount, I still paid more than I normally would for pillows.  I think the idea that they're offering such a great "deal" entices me to buy something I normally wouldn't.  I feel like I'm getting a good value because it's an expensive item that I would never pay retail for, but I'll stretch my budget if it's "on sale."  Do you find that to be the case for you, too?

I love the design, of course.  Red is definitely dominant, but the swirls of white bring an interest to the pillow without being too busy.

The other thing I appreciate is that they're hand embroidered by traditional artisans in India who earn fair trade wages.  I had heard of fair trade in the past, but learned more about it during our vacation to Seattle this summer when we went on a tour of a small chocolate factory that employs fair trade practices.  Part of the proceeds also goes to the Bholu Anganwadi Project which has built 8 pre-schools with Architects Without Frontiers Australia in underpriviledged communities.

I've been wanting to bring a real pop of color in the living room to wake up the space, and now I have art with lots of different colors that allows me to do that.  In fact, there are so many different colors in the art that I can order oodles of pillows and just change them out now and then to freshen things up!  (But don't tell The Mr.)

If you're interested in the pillows for yourself, the flash sale at Fab.com is now over, but you can buy this and other pillows by Bholu at Bobby Berk Home.  Here are some of my other favorites.

Nimboo Pillow by Bholu

Sas Lena Pillow by Bholu

Narvik 2 by Rouge Du Rhin

Narvik 3 by Rouge Du Rhin

Kitty Cat Darling Pillow by Naked Decor

By the way, you can find promotional codes for Bobby Berk Home and thousands of other retailers at RetailMeNot.com.  Have you heard of that site?  I never purchase anything online without checking for promo codes first!  Users like me list promo codes that others, in turn, can use.  For instance, if you get a coupon in the mail or via email and it has a promo code, you can upload the code to the site, and then others can benefit too.  A few popular retailers (like West Elm) block user submissions of promo codes, but most are fair game.  Be sure to check it out if you haven't before!

Can't wait for my new pair of bright red pillows to arrive so I can try them out on the sofa.  Pics to come!

Hollie

Friday, October 14, 2011

New artwork brings vibrancy to the living room

Remember this kaleidoscopic art I bought at Z Gallerie recently?


I am so excited to have it hung in our living room!


Doesn't it work so much better than either of these two options I considered?


My favorite colors are shades of blue, and this painting has so many various blues, including my beloved turquoise.  Plus there's white, red, yellow, green, purple, gray, black and more.  The vivid hues really wake up the living room, and will provide me with the ability to accessorize the room with all kinds of different colors.


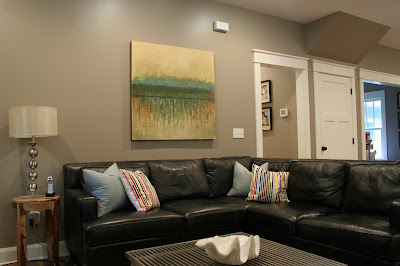
When we first moved here almost four years ago, I was all about a coastal look of soft blues and browns.  Although I still like that look, over time I have longed more and more for color and life, especially because our house is very shaded and the living room room can be fairly dark.  Yes, the large black leather sectional also accentuates the darkness, but I'm stuck with it!

The new art may not be everyone's cup of tea, but I'm in love with it, and The Mr. likes it too.  The Teen gave it the thumbs-down, but he doesn't "get" abstract, so oh well.

The best part of all this?  Now that the main art piece for the room is set, I can more forward with the rest of the room.  I'm looking forward to it!!!

Hollie

Thursday, October 13, 2011

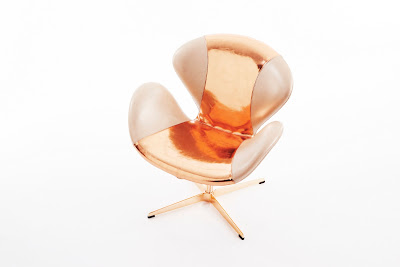
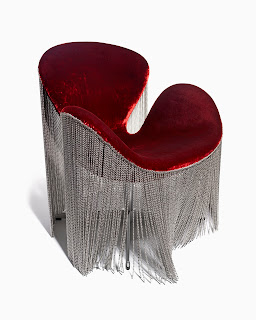
Designers take on the iconic Arne Jacobsen Swan chair for charity

Architect and designer Arne Jacobsen is famous for developing the Danish Modern style.  One iconic example of this is his Swan chair.


In October's issue of ELLE DECOR, I read about The Pink Swan Project, launched by SUITE New York to benefit the Breast Cancer Research Foundation.  Nineteen designers were invited to customize Swan chairs, which are being auctioned off at charitybuzz.com through October 31.

I don't know about you, but I can't afford the designer-deluxe versions.  Nevertheless, I can gawk at the artistry!

ELLE DECOR featured Madeline Weinrib's pink and white stripey ikat version.

Madeline Weinrib

That one had me at hello, so I just had to check out the others.  Here are my faves:

Windsor Smith
Alexandra Von Furstenberg
Campion Platt
D.B. Kim of PYR for Swarovski
David Mann

Julie Hillman
Kelly Hoppen
Victoria Hagan

The Madeline Weinrab version is my favorite design-wise, but if I had to pick one to go in my house, the Campion Platt or Windsor Smith chairs would do it.  I'm not a flashy gal, and those two are simple, yet luxe.

What's your favorite?

Hollie

Tuesday, October 11, 2011

Labeled bins to sort recyclables in the garage
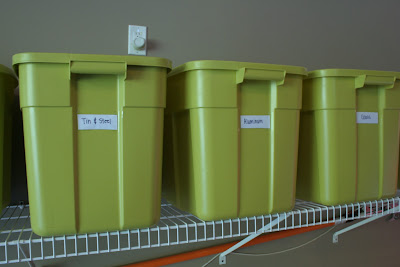
I'm a recycler.  Are you?  In the kitchen, I have a pullout trash cabinet that has room for two trash cans.  Because we recycle (and compost) many items, and since we're only a family of three, we don't go through more than one standard kitchen-size trash bag a week.  Therefore we're able to use the second kitchen trash can for recyclables.  When it fills up, we take the items out to the garage for sorting.

Out in the garage, I have an organized system of bins where I store sorted recyclables between trips to the recycling center.   (I don't live within the city limits, so there is no curbside recycling service, but the county does offer several permanent recycling locations.)


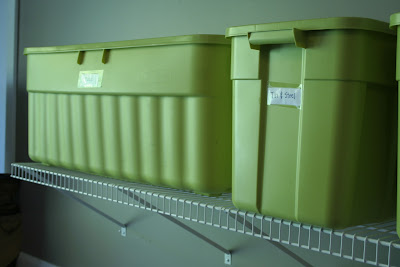
First, I purchased several plastic storage bins in several sizes from Home Depot.  I got them on sale after Christmas last year.  I use small bins for aluminum cans, tin cans, and glass, a medium bin for cardboard, and a large bin for plastic.  My guys go through a lot of milk, Coke Zero and Diet Sunkist, so our plastics bin always fills up first even though it's the largest!

I labeled each bin on the front so that everybody knows what gets sorted where.


Once the plastics bin is overflowing, it's time to load all the bins up in my car and take them to the recycling center.  Since I need the trunk, back seat and passenger seat to fit everything, I didn't want the bottoms of the bins to be all dirty from the garage floor.  Instead, I purchased a length of shelving and installed it along the wall just outside the door from the garage into the house, then I lined up all the bins on the shelving, with the plastics bin closest to the door.


Since the milk and 2 L soft drink bottles take up the most space, we toss those straight into the plastics bin on the garage rather than putting them in the smaller bin in our kitchen.  Larger cardboard boxes go straight to the garage bin, but smaller paperboard from food packaging, as well as glass bottles, aluminum cans, and tin cans go into the can in the kitchen until it's time for sorting.


We also have a bin for paper that we keep in our hall closet.  All paper in our house gets recycled.  Even when our document shredder gets full, I empty it into a bag for recycling.

We've been using this system since last January, and it's been working great for us.  Ironically the bins were empty when I took the photos because I had just made a trip to the recycling center.  It wasn't until I returned from the trip and was putting the bins back on the shelf that I thought others might benefit from our system, and decided to blog about it.

If you recycle, what's your system?

Hollie


Linking up to:

HookingupwithHoH


Newer Posts Older Posts Home